Just before Christmas we had a new client come to us with two things; an existing website and a whole lot of problems. We’re used to this happening and we take it in our stride, knowing that our business comes not only from building awesome new websites, but also in helping clients with sites that were built originally by other agencies/developers.
When this happens we always begin by performing an audit of the site to determine what we can do to make improvements, whether that be design fixes, development, UX, or a combination of all three. On this particular occasion one thing stood out above everything else;
The sheer size of the website. This thing was huge. It needed optimising in a hurry.
Although the site in this example was remarkable in how big it was, it’s not at all uncommon to see sites that are bigger than they ought to be, so I thought it’d be worth writing a little blog post on how to deal with a big (or ‘bigger than necessary’) WordPress site.
First and foremost.
You should never do anything to your site without first taking a backup. If this rule is not already drilled into your head like a well rehearsed mantra, make sure that it is before you proceed.
The following process is a perfect example of when taking a backup at the start is very important – you’ll be deleting files and folders. If you come to realise you should’ve never deleted that folder after all and you don’t have a backup…you’ll want to jump out the window. Believe me, I’ve been there!
You will need FTP access to take backups and carry out some of the following steps. If you’re not set up with an FTP client yet I recommend FileZilla (for both PC and Mac). Of course, if you’re not comfortable making these sorts of changes yourself we’d always recommend reaching out to a WordPress Specialist agency to help you out – it’s what we’re good at!
Step 1: Remove Redundant Themes and Plugins
Let’s start with the basics. There are two things you should know about deactivated themes and plugins on your WordPress install:
- They take up unnecessary space
- They represent a security risk (your site can still be breached via deactivated themes and plugins)
That’s just two good reasons to get rid of deactivated themes and plugins. I would also recommend that you take a close look at your activated plugins and ask yourself whether you really need all of them. It could well be that the functionality present in two plugins is actually covered by one (for instance, WordPress SEO by Yoast includes XML sitemap functionality, therefore removing the need for a separate XML sitemap plugin – this is just one of many examples), or maybe you have a bloated plugin whose resource intensiveness is not worth the added functionality.
Beyond taking care of the two issues above, removing plugins should also result in an increase in site speed, which is never a bad thing!
Step 2: Change Your Media Settings
The media files on your server probably account for the majority of your website’s bulk. This is to be expected, but WordPress is particularly notorious for creating various duplicates of the same file and making your media folder two or three times larger than it needs to be.
It comes down to image sizes, which you can define on your WordPress dashboard by navigating to Settings > Media:
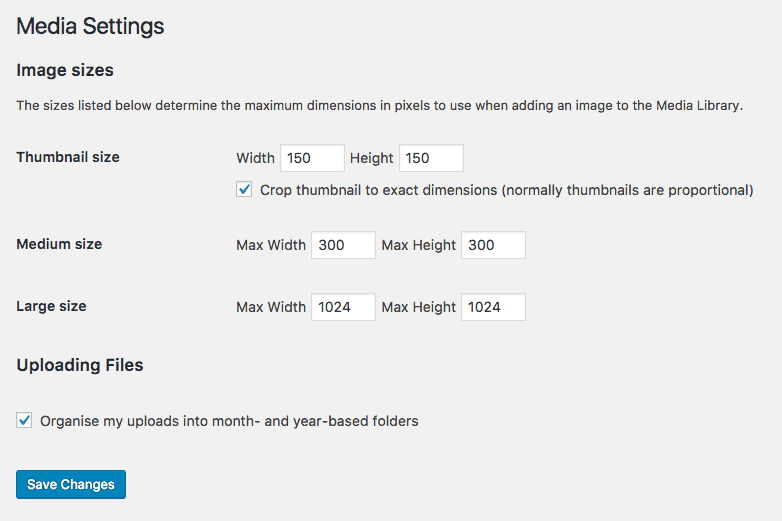
With these three image sizes defined, WordPress creates three separate image files in addition to the version you upload. That’s four images for each file you upload, of which you may only use one.
You probably don’t need more than one size of a particular image, and if you do, you’d probably be better off uploading them in their respective sizes (so that you have control over cropping etc). And that is exactly my recommendation — start uploading images in the correct size and dimensions so that you don’t need to do any fiddling on the WordPress side.
But what about those pesky image files that WordPress creates? Simple — just change the Max Width and Max Height fields to zero in the Settings > Media screen and WordPress will no longer create them. This may have adverse effects depending on how your theme is set up so I would advise that you take a backup and experiment before committing.
A final tip is to use a lossless optimisation plugin like Kraken or EWWW Image Optimiser to reduce the size of your image files when they are uploaded. It’ll only take a minute to install, activate and setup either of these plugins and from then on it it will do its job without you having to lift a finger.
Unless you have major size issues I wouldn’t worry about deleting the old image files that you don’t use. There is no foolproof automated way of doing it and it is probably more trouble than it is worth.
Step 3: Remove Old Backups
Many WordPress sites become huge and bloated due to the fact that full backups are stored on the server. Putting the size issue aside for a moment, this is not a particularly effective way of backing up your data…if the server where your website lives is corrupted you may well lose both your site and the backup. Plugins like BackupBuddy are terrible for this, which is why we recommend scheduled remote backups to cloud services like Amazon AWS, Dropbox and Google Drive.
Going back to the size issue, you should get rid of the backups on the server and ensure that whatever process that is causing backups to be stored locally is stopped (of course, you should set up a remote backup before taking this step). The key is to look out for suspicious folders (e.g. ones labelled “Backups” or “Archive”) and particularly large files — for the most part, there are few instances where you will be storing files in excess of more than 10mb on your site (videos and audio being two potential exceptions).
This is something to look out for if you’ve been using a free third party backup plugin or service — you may find that the developers have little regard for how much space they take up on your server. My top tip for backups is to use ManageWP Orion as it has a tonne of great features including secure backup options. To write about it here would make this blog post a bit too long but I’d encourage you to head over here to find out more!
Step 4: Remove Random Files
There are plenty of things that may appear on your site’s servers that simply don’t belong there. One example I found in this instance was “core” files (e.g. a file labelled “core.129627″) — an issue that can arise occasionally. These files (which are actually WordPress core dumps) can be upwards of 100mb each and appear in large numbers, yet they shouldn’t be there at all. You can safely delete them and should also inform your hosting provider of the issue so that they can resolve it.
As a rule of thumb, any file that is particularly large should be viewed with suspicion. As I said previously, there are few times when a website will utilise a large file. I’m not however suggesting that you should start deleting large files willy nilly — it pays to be sure that what you are deleting isn’t important for the running of your website, even if you do have a backup ready should something happen. If you do find something suspicious then turn to Google, the WordPress support forums, or a trusted WordPress Specialist Agency for help.
Step 5: Optimise Your Database
Now that you’ve worked on all of the above, you’re well on your way to improving the size and performance of your site. The final thing you’ll want to take a look at is any optimisations that can be made to your database. This is a big topic by itself, so for further reading I’d recommend this article by the guys at WPMU Dev. In a nutshell you’ll want to consider clearing out old post revisions, tables no longer needed (such as from plugins no longer in use), and comments metadata.
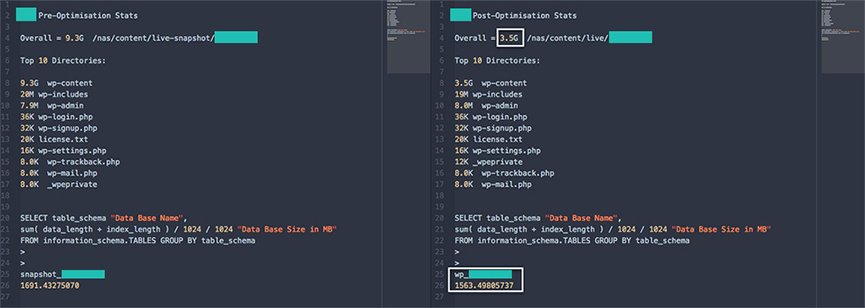
Results
Below are the results from this specific test. First up is a breakdown before and after of the disk size and database.
Second, another before and after. This time a speed test prior to any sort of optimisation, compared with another speed test after the improvements above were made.

As you can see from both of these results, the steps listed out in this article made some significant improvements to the site in question and in turn have made it a much cleaner starting point for any further revisions needed.
So there you have it; some very practical tips on improving the size and performance of your WordPress site!
Need some help improving your WordPress performance?
Give us a call on 02921 961661 or email the team at [email protected] and we’ll be glad to help!